
There are many reasons why you may want to add a custom field on your product page:
- To allow store visitors to have the ability to personalize a product before the purchase
- To go beyond the 100 variant limit for your products
There are many apps that give you the ability to do that, but they charge monthly for that, they can slow down the loading speed of your store and even affect your Cumulative Layout Shift Store (CLS) which is an SEO metric. (When using an app the fields get added after the page loads with Javascript which moves your entire form)
The best way in my opinion to add a custom field is simply using code edits, and I’m going to give you the code to copy paste directly into your theme for most of the field types you may need:
- Short text
- Long text
- Checkbox
- Date
- Drop-down select
- Radio buttons
- File/Image upload
The value of the custom field will be shown on the Cart page, Checkout page and with your orders on the admin panel once someone makes a purchase. I will also show you how to make that value appear on the confirmation email and on the packing slip.
1. Create a new product page template
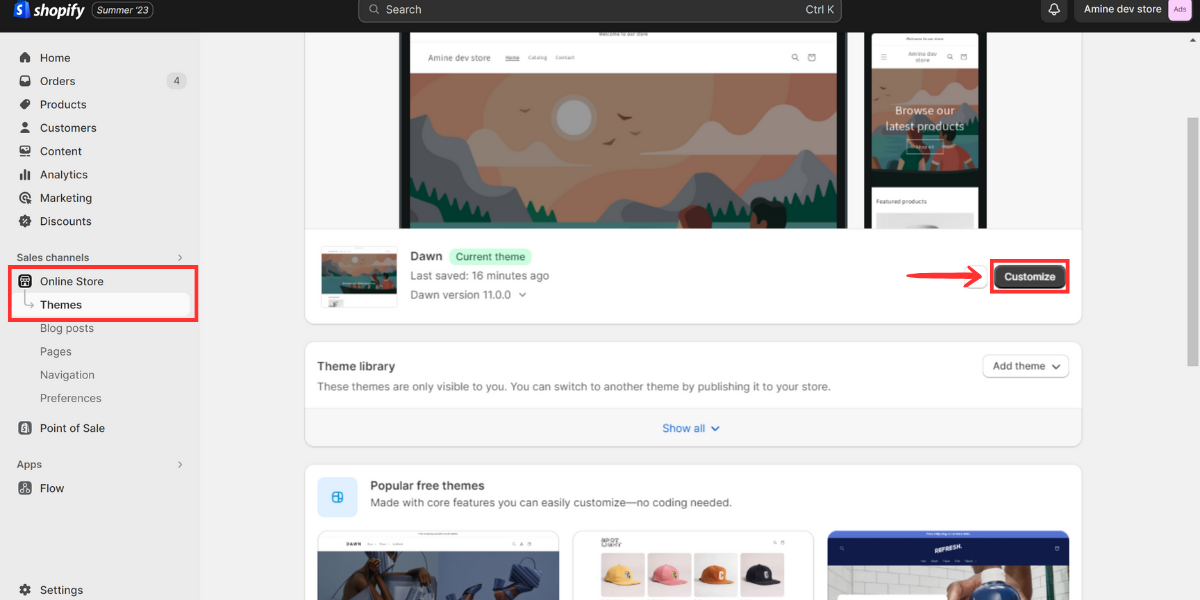
You most likely don’t want the fields to appear for all your products so let’s create a new product page template for the products we want to show the field for. To do that head over to the Shopify admin panel, click on themes under online store, then click customize on your live theme, since we need to create the teamplte on the live for it to appear on the Shopify admin.
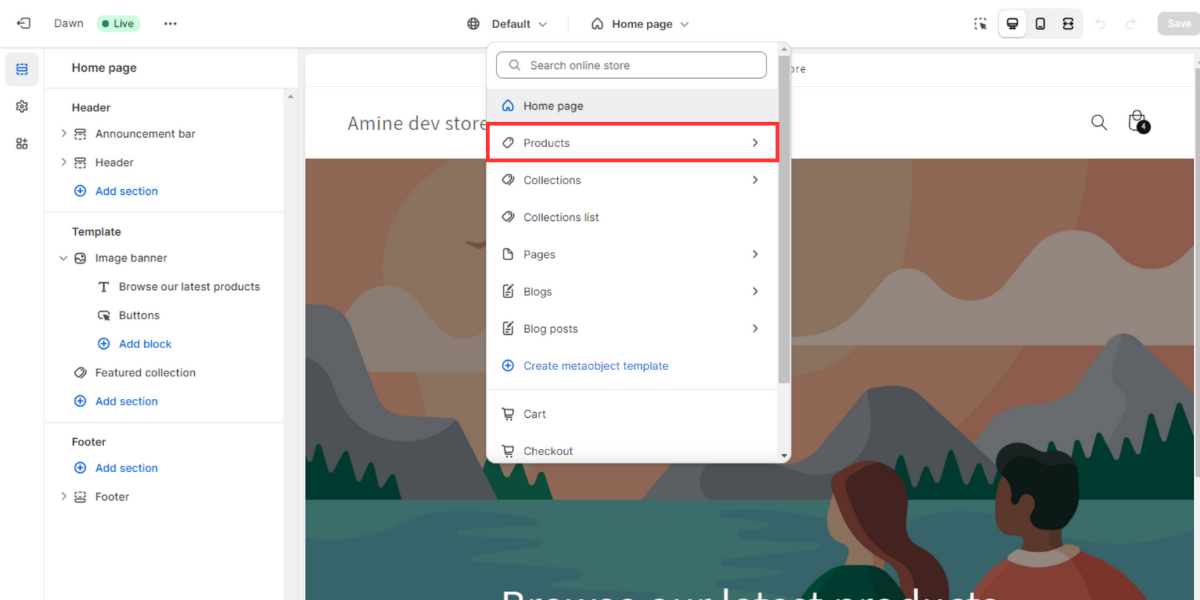
Then at the top of the screen click on the “Home page” dropdown select and choose products
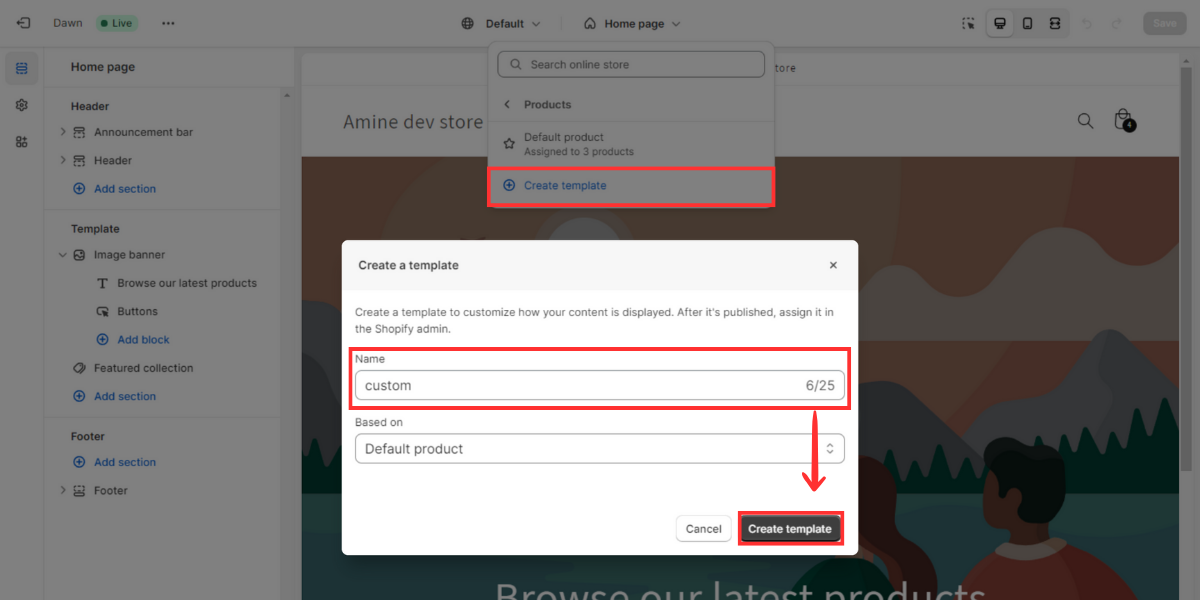
Clicks on Create template, give it any name, you can name it custom for example
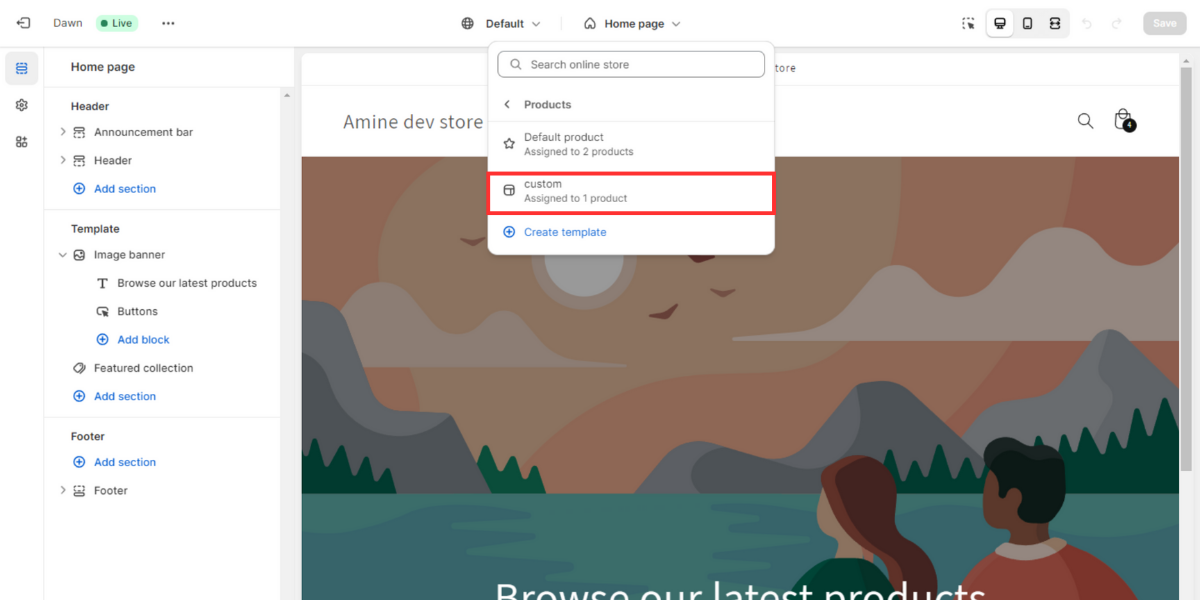
The Next step is to assign the custom template page to the products we want to show the custom fields for, to do that click on products and choose the one you want, scroll down to theme templates, select the new template, and save.

2. Copy the code snippet
I have prepared something special for you this time, it’s a code generator for Shopify fields, it has all the Shopify fields that you may need, click on the button below to access it:
After setup up the field, click on the copy the code button.
3. Add the code to the theme
Once you copied the code for the field, open the Shopify customizer again and choose the new product page template.
Add a new custom liquid block for the Product information section
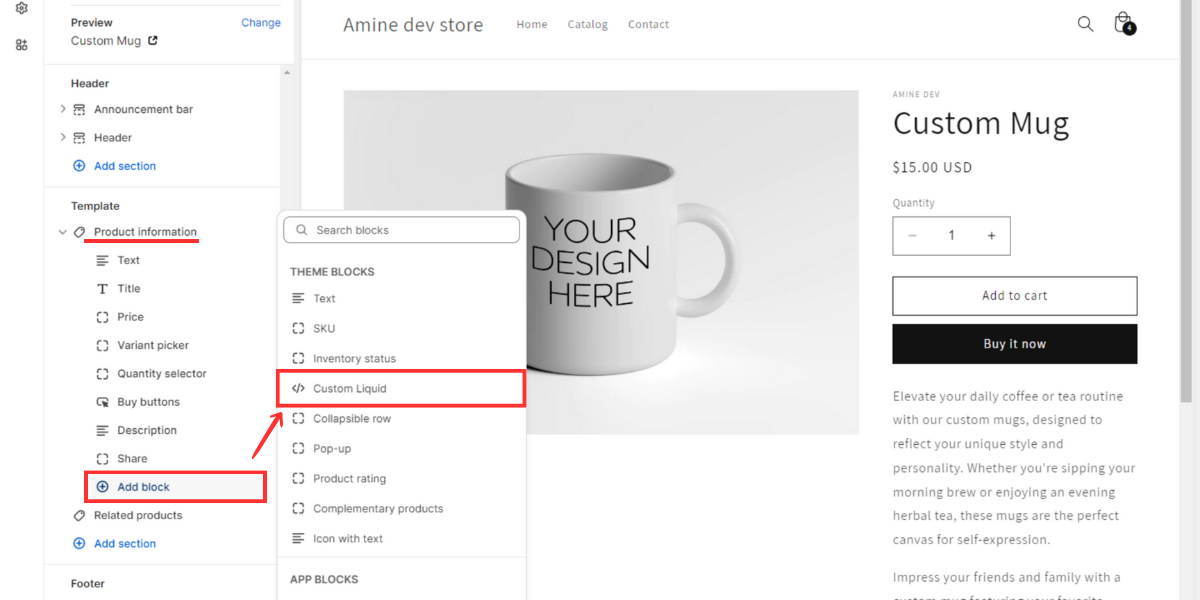
Drag the block where you need it, it’s typically under the variant picker. Paste your code and save.
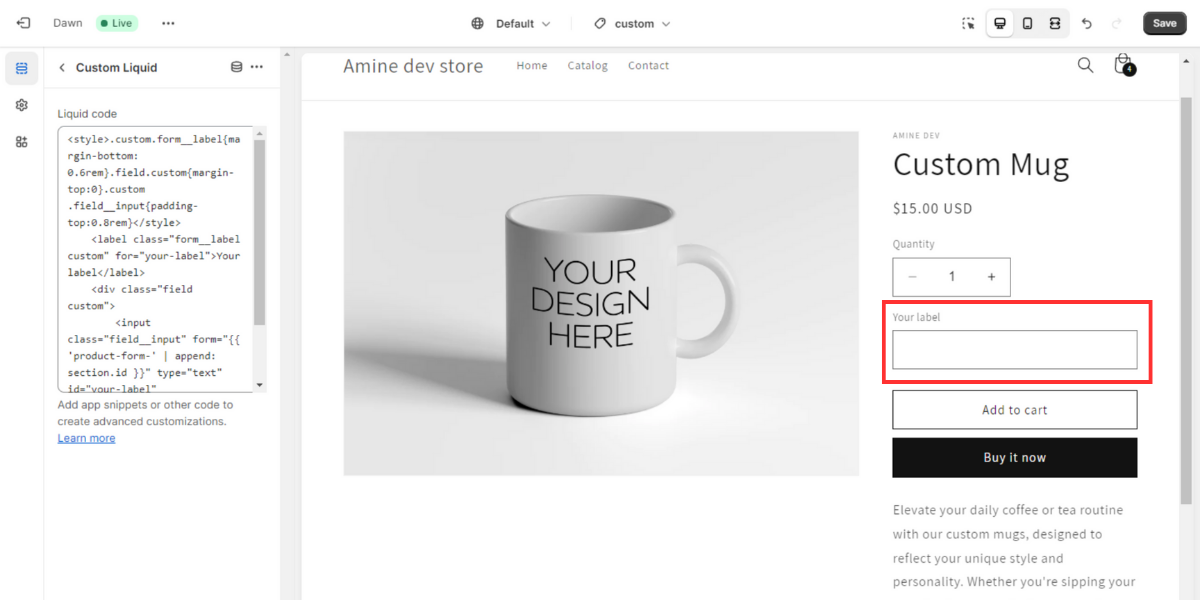
🎉Congratulations you have now added your custom field, its value will shown on the cart, checkout and on the order details page on the admin panel after a customer makes a purchase!
4. Show field value on other Shopify areas
Confirmation email
To show the values of our custom fields, from your admin panel navigate to Settings > notifications > order confirmation and click on edit code, scroll down to line 251 where you can find this chunk of code :
<!-- Delete this line -->{% if line.gift_card and line.properties["__shopify_send_gift_card_to_recipient"] %}
{% for property in line.properties %}
{% assign property_first_char = property.first | slice: 0 %}
{% if property.last != blank and property_first_char != '_' %}
<div class="order-list__item-property">
<dt>{{ property.first }}:</dt>
<dd>
{% if property.last contains '/uploads/' %}
<a href="{{ property.last }}" class="link" target="_blank">
{{ property.last | split: '/' | last }}
</a>
<img style="max-width:50%" src="{{ property.last }}">
{% else %}
{{ property.last }}
{% endif %}
</dd>
</div>
{% endif %}
{% endfor %}
{% endif %}<!-- Delete this line -->
Then delete the line {% if line.gift_card and line.properties["__shopify_send_gift_card_to_recipient"] %} , with its closing tag {% endif %}, don’t delete what’s inside online the two if tags.
You can always click the reset default button if you delete something else by mistake.
Packing slip
By default the additional field values won’t show on the packing slip, we need to edit the packing slip to add the values of our custom fields.
From the admin panel, click on the search bar and type packing slip template, scroll down to line 131 to the {%endif%} tag of the line_item.variant_title , and paste the code below right after that:
{%- for property in line_item.properties -%}
{%- assign property_first_char = property.first | slice: 0 -%}
{%- if property.last != blank and property_first_char != '_' -%}
    <span class="line-item-description-line">
    <span>{{ property.first }}:</span>
    <span>
        {%- if property.last contains '/uploads/' -%}
        <a
            href="{{ property.last }}"
            class="link"
            target="_blank"
            aria-describedby="a11y-new-window-message"
        >
            {{ property.last | split: '/' | last }}
        </a>
        <img style="max-width:50%" src="{{ property.last }}">
        {%- else -%}
        {{ property.last }}
        {%- endif -%}
    </span>
    </span>
{%- endif -%}
{% endfor %}
To test if the value is showing properly, you can try printing the packing slip of an order that contains a custom field value.
For products has a custom image uploaded, we will have it present on the packing slip too, if you don’t need it, simply delete the image tag <img style="max-width:50%" src="{{ property.last }}"> in the code snippet that you paste.
5. Explaining how the code works
Let me explain the code below for a simple text field present that you get when you use the generator:
<style>
    .custom.form__label{margin-bottom: 0.6rem}
    .field.custom{margin-top:0}
    .custom .field__input{padding-top:0.8rem}
</style>
<label class="form__label custom" for="your-label">Your label</label>
<div class="field custom">
    <input class="field__input" type="text" id="your-label"
    form="{{ 'product-form-' | append: section.id }}"
    name="properties[Your label]">
</div>
So the basic html input field looks like this
<label for="custom-field">Custom field</label>
<input type="text" id="custom-field">
We can add it as a liquid block code and it will show up on the product page, although it won’t work yet.
We need to give its value a name that shows up on the cart, checkout and on the order details on the admin panel.
To do that we will use the line item property, which is an array that can hold additional values for the product.
It follows this format name="properties[name], where the text inside the brackets is the property name, we add it as a name attribute for the html input.
<label for="custom-field">Custom field</label>
<input type="text" id="custom-field" name="properties[Your label]">
The next step is to connect it to the product form, what we have seen so far is common to all themes, but how we connect it to the form is theme specific and it changes from one theme to another, luckily all the Free Shopify themes share the same code base.
If you are using a premium theme you will have to find the form attribute used to connect inputs to the form element
For the Free Shopify themes the form follows this format form="product-form-template--21051274690869__main" and on the liquid file here is what it looks like form="{{ 'product-form-' | append: section.id }}"
We will just add the form attribute to our html input element, and our field will be properly connected to the form.
<label for="custom-field">Custom field</label>
<input type="text" id="custom-field"
form="{{ 'product-form-' | append: section.id }}"
name="properties[Your label]">
The last step is to just style our field, we can reuse the classes used by the theme itself with a litte bit of css of our own and we end up with this code that you can find on the generator.
<style>
    .custom.form__label{margin-bottom: 0.6rem}
    .field.custom{margin-top:0}
    .custom .field__input{padding-top:0.8rem}
</style>
<label class="form__label custom" for="your-label">Your label</label>
<div class="field custom">
    <input class="field__input" type="text" id="your-label"
    form="{{ 'product-form-' | append: section.id }}"
    name="properties[Your label]">
</div>
FAQ
How can I charge extra if a customer fills a custom field?
Unfortunately, it can’t do that simply by editing the theme (at least in a clean way), You will need to use a Shopify app like Bold Option.
How can I create a live image preview that changes based on the value of the custom field?
I highly encourage you to use a Shopify app like Zepto Product Personalizer.